ns-3上へのL1 (物理層)+L2 (MAC層)の実装について †
ns-3上で独自のL1 (物理層)+L2 (MAC層)を実装する方法を解説します。2ノード間のL1+L2でパケットを渡しあうだけの簡単なモジュール「tictoc」の実装を通してL1+L2の実装方法を解説していきます。
ns-3のインストール †
tictocモジュールの実装はns-3.20がhomeディレクトリにインストールされているものと仮定して話を進めていくため、↓を参考にしてns-3.20をインストールしてください。
tictocモジュールについて †
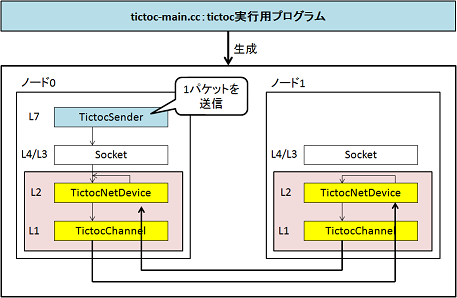
↑の図にあるように、ノード0とノード1のL2 (MAC層)間でパケットを渡しあうモジュールです。パケットの伝送に1秒かかる設定としてあるため、1秒ごとにパケットがノード間を行き来します。
tictocモジュールの実装 †
tictocモジュールの作成 †
ns-3で新しいモジュールを作成するためにはcreate-module.pyを利用します。 ↓のコマンドを実行することでtictocモジュールを作成できます。
cd ~/ns-allinone-3.20/ns-3.20/src/
python create-module.py tictoc
/ns-allinone-3.20/ns-3.20/src/tictocにモジュールが作成されます。 新しいモジュールを作成したらビルドしましょう。
cd ~/ns-allinone-3.20/ns-3.20/
./waf configure
./waf
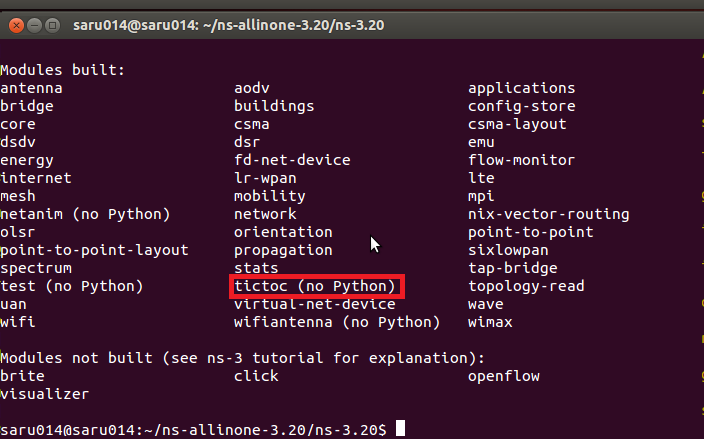
ビルドに成功すると↓の画像のようにtictocモジュールが追加されます。
TictocChannelとTictocNetDeviceクラスの配置 †
↑の図はtictocモジュールのクラス図です。 ns-3上で新しくL1+L2を実装するためにはChannelとNetDeviceクラスを継承した新しいクラスを作る必要があります。ChannelはL1、NetDeviceはL2にそれぞれ対応しています。
ns-3ではChannelを継承したひな型となるクラスSimpleChannel、NetDeviceを継承したひな型となるクラスSimpleNetDeviceが提供されています。 それらのひな型となるクラスを利用することで、簡単にL1とL2が実装できるため、それらのひな型となるクラスを改良してTictocChannelとTictocNetDeviceクラスを作ります。
まず、ひな型となるクラスを名前を変えてtictocディレクトリにコピーします。
cd ~/ns-allinone-3.20/ns-3.20/src/tictoc/
cp ../network/utils/simple-net-device.cc model/tictoc-net-device.cc
cp ../network/utils/simple-net-device.h model/tictoc-net-device.h
cp ../network/utils/simple-channel.cc model/tictoc-channel.cc
cp ../network/utils/simple-channel.h model/tictoc-channel.h
コピーが終了したら↓の4つのことをしましょう。
- クラス名の衝突を避けるためにクラス名を変更する
find model/ -type f | xargs sed -i "s/SimpleNetDevice/TictocNetDevice/g"
find model/ -type f | xargs sed -i "s/SimpleChannel/TictocChannel/g"
- tictoc-channel.h・tictoc-net-device.hがインクルードされるようにマクロ名を変更する
sed -i "s/SIMPLE_NET_DEVICE/TICTOC_NET_DEVICE/g" model/tictoc-net-device.h
sed -i "s/SIMPLE_CHANNEL/TICTOC_CHANNEL/g" model/tictoc-channel.h
- tictoc-channel.h・tictoc-net-device.hなどがインクルードされるようにインクルードするファイル名を変更する
find model/ -type f | xargs sed -i "s/simple-net-device/tictoc-net-device/g"
find model/ -type f | xargs sed -i "s/simple-channel/tictoc-channel/g"
find model/ -type f | xargs sed -i "s/mac48-address/ns3\/mac48-address/g"
- wscriptの以下の部分を編集・追加する
...
    module = bld.create_ns3_module('tictoc', ['core', 'network'])
    module.source = [
        'model/tictoc.cc',
        'helper/tictoc-helper.cc',
        'model/tictoc-net-device.cc',
        'model/tictoc-channel.cc'
        ]
...
    headers.module = 'tictoc'
    headers.source = [
        'model/tictoc.h',
        'helper/tictoc-helper.h',
        'model/tictoc-net-device.h',
        'model/tictoc-channel.h'
        ]
...
↑の4つが終了したらビルドしなおします。これで、配置は完了です。
cd ~/ns-allinone-3.20/ns-3.20/
./waf
TictocChannelとTictocNetDeviceクラスの説明 †
TictocChannelクラスはtictoc-channel.ccに記述されています。 TictocChannelの主要な関数として、Send関数があります。 Send関数は、自ノード以外の全てのノードにパケット等を渡す役割を持ちます。 具体的には、Simulator::ScheduleWithContext関数を利用して、自ノード以外の全てのノードのTictocNetDeviceのReceive関数をスケジューリングします。Simulator::ScheduleWithContext関数の第1引数はノード固有の番号、第2引数はScheduleWithContext関数が呼び出された時間からスケジューリングされる関数が呼び出されるまでの間の時間、第3引数はスケジューリングされる関数、第4引数以降は第3引数に指定した関数の引数です。
void
TictocChannel::Send (Ptr<Packet> p, uint16_t protocol,
                     Mac48Address to, Mac48Address from,
                     Ptr<TictocNetDevice> sender)
{
  NS_LOG_FUNCTION (this << p << protocol << to << from << sender);
  for (std::vector<Ptr<TictocNetDevice> >::const_iterator i = m_devices.begin (); i != m_devices.end (); ++i)
    {
      Ptr<TictocNetDevice> tmp = *i;
      if (tmp == sender)
        {
          continue;
        }
      Simulator::ScheduleWithContext (tmp->GetNode ()->GetId (), Seconds (0),
                                      &TictocNetDevice::Receive, tmp, p->Copy (), protocol, to, from);
    }
}
TictocNetDeviceはtictoc-net-device.ccに記述されています。 TictocNetDeviceの主要な関数として、Send関数・Receive関数があります。
Send関数はL3からパケット、送信先IPアドレス、プロトコル番号を受け取り、L1にそれらを渡す役割を持ちます。m_channel->Send (packet, protocolNumber, to, m_address, this);を呼び出すことでL1に渡しています。
bool
TictocNetDevice::Send (Ptr<Packet> packet, const Address& dest, uint16_t protocolNumber)
{
  NS_LOG_FUNCTION (this << packet << dest << protocolNumber);
  Mac48Address to = Mac48Address::ConvertFrom (dest);
  m_channel->Send (packet, protocolNumber, to, m_address, this);
  return true;
}
Receive関数は、L1からパケット、プロトコル番号、送信先MACアドレス、送信元MACアドレスを受け取り、それらをL3に渡す役割を持ちます。m_rxCallback (this, packet, protocol, from);を呼び出すことでL3にパケットを渡します。
void
TictocNetDevice::Receive (Ptr<Packet> packet, uint16_t protocol,
                          Mac48Address to, Mac48Address from)
{
  NS_LOG_FUNCTION (this << packet << protocol << to << from);
  NetDevice::PacketType packetType;
  ...
  m_rxCallback (this, packet, protocol, from);
  ...
}
TictocChannelとTictocNetDeviceクラスの編集 †
tictocのメカニズムが正しく動作するようにTictocChannelとTictocNetDeviceクラスを編集します.
まず、L1から受信したパケットをL3には渡さず、すぐにL2に渡すようにするためTictocNetDeviceのReceive関数を編集します。 L3に渡さないようにするためm_rxCallback (this, packet, protocol, from);をコメントアウトして、L2に渡すようにするためL1のSend関数を呼び出します。
void
TictocNetDevice::Receive (Ptr<Packet> packet, uint16_t protocol,
                          Mac48Address to, Mac48Address from)
{
  ...
  // m_rxCallback (this, packet, protocol, from);
  m_channel->Send (packet, protocol, Mac48Address ("ff:ff:ff:ff:ff:ff"), m_address, this);
  ...
}
次に、1秒ごとにパケットを受信するようにTictocChannelのSend関数を編集します。 ScheduleWithContext関数のSeconds (0)をSeconds (1)に変更します。
bool
TictocChannel::Send (Ptr<Packet> p, uint16_t protocol,
		     Mac48Address to, Mac48Address from,
		     Ptr<TictocNetDevice> sender)
{
...

      Simulator::ScheduleWithContext (tmp->GetNode ()->GetId (), Seconds (1),
                                      &TictocNetDevice::Receive, tmp, p->Copy (), protocol, to, from);
...
}
tictocモジュールの利用 †
作成したtictocモジュールを利用するには、tictoc実行用プログラムを作る必要があります。tictoc実行用プログラムはこちらで用意したので、用意したプログラムを利用してください。
tictoc実行用プログラム †
↑の図にこちらで用意したtictoc実行用プログラムの概要を示します。 青色で示した部分がこちらで用意したプログラムです。 tictoc-main.ccはシミュレーションモデルを生成するために利用します。 TictocSenderは1パケットを送信するためのアプリケーションとして利用します。
tictoc-main.ccでは、ノードモデルとして、ノード0とノード1の2つのノードを生成して、生成したノード0から1つパケットを送信するようなモデル生成します。L1+L2のモデルとしてL1にTictocChannel、L2にTictocNetDeviceを利用するようにモデルを生成します。
tictoc実行用プログラムの配置 †
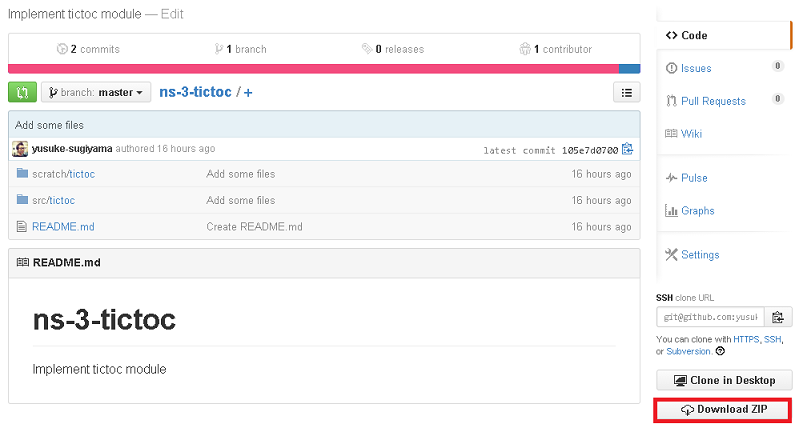
まず、git(ns-3-tictoc)からソースコードをダウンロードしてください。https://github.com/yusuke-sugiyama/ns-3-tictocを開くと↓のページが表示されます。
右下のDownload ZIPをクリックすると「ns-3-tictoc-master.zip」がダウンロードできます。
ダウンロードした「ns-3-tictoc-master.zip」をhomeディレクトリに置いたと仮定して話を進めます。まず、以下のコマンドを利用してzipを解凍します。
unzip ns-3-tictoc-master.zip
すると、「ns-3-tictoc-master」ディレクトリが生成されるのでcdコマンドでそのディレクトリに移動します。
cd ns-3-tictoc-master
次に、「ns-3-tictoc-master/scratch」の中身ををns-3.20の「scratch」に追加します。
ns-3.20の「scratch」に「tictocフォルダが追加されます。
cp -r scratch/* ../ns-allinone-3.20/ns-3.20/scratch/
最後にns-3.20のディレクトリに移動して、「waf」を用いてビルドします。
cd ~/ns-allinone-3.20/ns-3.20/
./waf
tictocの実行 †
tictocを実行するために、ns-3のディレクトリに移動します。
cd ~/ns-allinone-3.20/ns-3.20/
TictocNetDeviceとTictocChannelのログを表示するために環境変数NS_LOGに 値を書き込みます。
export "NS_LOG=TictocNetDevice:TictocChannel=debug|info|function"
最後にwafを用いて実行します。
./waf --run "tictoc"
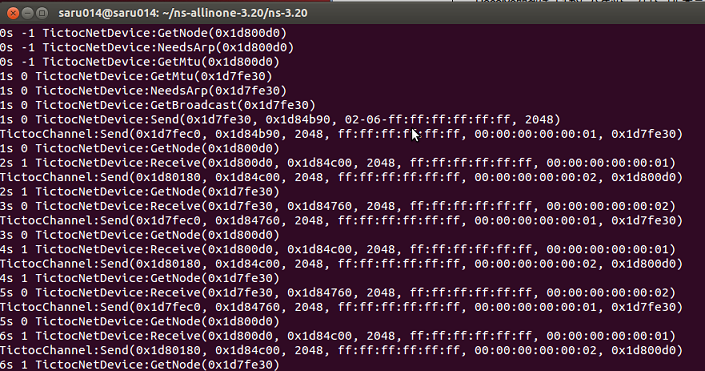
実行すると↓の画像のようなログが表示されます。ログを見ると1秒ごとに、ノード間をパケットが行き来していることが分かります。 ログの書式は
時間S ノード番号 クラス名:関数(引数等)
となっています。
tictocの説明 †
tictoc実行用プログラム「tictoc-main.cc」の主要な部分について説明します。 大まかには以下のようになっています。
- 6~7行目:ノードの作成
- 8~24行目:ノードにTictocChannelとTictocNetDeviceを割り当て
- 26~30行目:ノードにIPアドレス・プロトコルスタックを割り当て
- 32~34行目:ノード0にTictocSenderを割り当て
- 36行目:シミュレーションの開始
#include "ns/3/tictoc-module.h"
...
int main (int args, char *argv[])
{
  ...
  NodeContainer nodes;
  nodes.Create (2);
  Ptr<TictocChannel> channels [2];
  Ptr<TictocNetDevice> netDevices [2];
  for (int i = 0; i < 2; i++){
    Ptr<Node> node = NodeList::GetNode (i);
    netDevices [i] = CreateObject<TictocDevice> ();
    channels   [i] = CreateObject<TictocChannel> ();
    netDeviceContainer.Add (netDevices [i]);
    node->AddDevie (setDevices [i]);
    netDevices [i]->SetNode (node);
    netDevices [i]->SetChannel (channels [i]);
    netDevices [i]->SetAddress (Mac48Address::Allocate ());
  }
  for (int i = 0; i < 2; i++){
    for (int j = 0; j < 2; j++){
      channels [i]->Add (netDevices[j]);
    }
  }
  ...
  InternetStackHelper internet;
  internet.Install (nodes);
  Ipv4AddressHelper ipAddrs;
  ipAddrs.SetBase ("192.168.0.0", "255.255.255.0");
  ipAddrs.Assign (netDeviceContainer);
  ...
  Ptr<TictocSender>   sender   = CreateObject<TictocSender>();
  sender  ->SetStartTime (Seconds (1));
  NodeList::GetNode (0)->AddApplication (sender);
  ...
  Simulator::Run ();
  ...
}


